Salesforce Service Cloud is a powerful customer service and support platform designed to help businesses manage customer inquiries, issues, and interactions efficiently. In this tutorial, we’ll explore the key features of Service Cloud, understand its data model, and learn how it differs from other Salesforce applications like Sales Cloud. By the end of this guide, you’ll have a solid foundation for using Service Cloud to enhance your organization’s customer service operations.
In this Salesforce Service Cloud tutorial, we’ve covered:
- The basics of Service Cloud and its importance.
- The prerequisites for setting up and using Service Cloud.
- The key objects in the Service Cloud data model.
- The differences between the Service App and Service Console App.
- How to manage cases and utilize various channels for case creation.
What is Salesforce Service Cloud?
Salesforce Service Cloud is a customer relationship management (CRM) platform focused on providing superior customer service and support. It allows organizations to:
- Manage Customer Inquiries: Track and resolve customer issues efficiently using cases.
- Provide Multiple Communication Channels: Engage with customers through phone, email, web, chat, and more.
- Automate Service Processes: Use tools like assignment rules, escalation rules, and macros to streamline workflows.
- Create Knowledge Bases: Develop and maintain knowledge articles to assist both customers and support agents.
- Offer Personalized Support: Gain a 360-degree view of customers to provide tailored solutions.
Service Cloud is essential for businesses aiming to improve customer satisfaction, reduce service costs, and build long-term customer relationships.
Prerequisites for Using Service Cloud
Before diving into Service Cloud, ensure you have the necessary permissions and licenses:
- Salesforce User License: You must have a Salesforce user account with appropriate permissions.
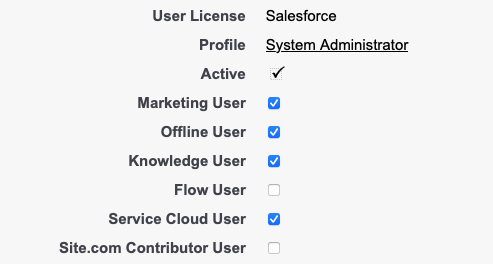
- Enable Service Cloud User:
- Navigate to Setup > Users > Users.
- Select the user and click Edit.
- Check the Service Cloud User checkbox.
- Enable Knowledge User (Optional):
- If you plan to use Salesforce Knowledge for knowledge articles, enable the Knowledge User checkbox on the user record.
- Customer Community Users (Optional):
- For Experience Cloud (formerly Community Cloud), set up customer community users with appropriate licenses.
Understanding the Service Cloud Data Model
The Service Cloud data model revolves around the Case object but includes several other key objects:
| Object | Description |
|---|---|
| Account | Represents a company or organization. |
| Contact | Represents an individual associated with an account. |
| Case | Central to Service Cloud; stores customer issues, complaints, or problems. |
| Case Team Member | Users who collaborate on a case. |
| Entitlement | Defines the level of support provided to a customer. |
| Service Contract | Agreement between your company and the customer. |
| Knowledge Article | Documents containing solutions and FAQs. |
| Solution | Deprecated but still present in some orgs for legacy purposes. |
| Case Milestone | Tracks critical steps in the case resolution process. |
Service App vs. Service Console App
Salesforce provides two main applications for service agents:
Service App (Standard Navigation)
- Navigation Style: Similar to other Salesforce apps with tabs across the top.
- Use Case: Suitable for simple service processes.
- Limitations:
- Switching between records can be time-consuming.
- Not optimized for handling multiple records simultaneously.
Service Console App (Console Navigation)
- Navigation Style: Uses a tab-based workspace with sub-tabs.
- Use Case: Ideal for agents handling multiple cases, accounts, or contacts at once.
- Advantages:
- Open multiple records in tabs and sub-tabs without losing context.
- Access to utilities like softphones, history, and bookmarks.
Creating a Console App:
- Go to Setup > App Manager.
- Click New Lightning App.
- Choose Console Navigation when selecting the navigation style.
Case Management in Service Cloud
The Case object is the cornerstone of Service Cloud. Here’s how it works:
- Case Creation:
- Cases can be created manually by agents or automatically through various channels.
- Case Fields:
- Standard fields include Case Number, Status, Priority, Origin, Subject, and Description.
- Custom fields can be added to capture additional information.
- Record Types and Support Processes:
- Use record types to handle different case types (e.g., technical support, billing issues).
- Support processes define the lifecycle of a case status for each record type.
- Case Teams:
- Collaborate by adding multiple users to a case.
- Case Feed and Chatter:
- Use Chatter for real-time updates and communication on a case.
Channels for Case Creation
Service Cloud supports multiple channels through which customers can create cases:
- Email-to-Case:
- Automatically converts customer emails into cases.
- Supports attachments and email threading.
- Web-to-Case:
- Embeds a case submission form on your website.
- Captures customer issues directly from your site visitors.
- Phone:
- Agents can create cases while speaking with customers.
- Integrate with CTI systems for enhanced capabilities.
- Chat and Messaging:
- Real-time support via web chat or messaging apps.
- Requires additional setup with Salesforce Live Agent or Messaging.
- Communities (Experience Cloud):
- Customers can log cases through a self-service portal.
- Social Media:
- Monitor and respond to customer issues on platforms like Twitter and Facebook.
Conclusion
Salesforce Service Cloud is an essential tool for organizations aiming to deliver exceptional customer service. By understanding its data model, navigation options, and case management features, you can configure Service Cloud to streamline your support processes effectively.
With this foundation, you’re ready to explore Service Cloud further, customize it to your needs, and provide top-notch service to your customers.
Next Steps:
- Explore Service Console Features: Familiarize yourself with workspace layouts, utility bars, and keyboard shortcuts.
- Set Up Case Automation: Learn about assignment rules, auto-response rules, escalation rules, and macros.
- Implement Knowledge Management: Start creating knowledge articles to empower agents and customers.
- Configure Omni-Channel Routing: Efficiently distribute work to agents based on capacity and skill.
Additional Resources: