The Salesforce AppExchange provides pre-built solutions for integrating Facebook with your Salesforce org. This integration allows you to manage Facebook notifications, conversations, and social media interactions directly within Salesforce without switching between platforms.
What is Salesforce AppExchange?
Salesforce AppExchange is the official marketplace for third-party applications that extend Salesforce functionality. With over 5,000 apps and components, AppExchange offers solutions for CRM enhancement, integration patterns, and business process automation. Apps are available as free, freemium, or paid solutions.
The AppExchange includes:
- Pre-built integrations for social media platforms
- Industry-specific solutions
- Custom components and Lightning Web Components
- Analytics and reporting tools
- Security and compliance applications
Why Integrate Facebook with Salesforce?
Facebook integration with Salesforce enables sales and marketing teams to:
- Track social media interactions as customer touchpoints
- Monitor brand mentions and customer feedback
- Create leads from social media engagement
- Manage social customer service inquiries
- Analyze social media ROI within Salesforce reports
How to Install Facebook Integration from AppExchange
Follow these steps to integrate Facebook with your Salesforce org using AppExchange:
Step 1: Access Salesforce AppExchange
- Sign in to your Salesforce org using your username and password
- Navigate to the App Launcher (9-dot grid icon) in the top-left corner
- Select “AppExchange” from the dropdown menu
- You will be redirected to appexchange.salesforce.com

Step 2: Search for Facebook Integration Apps
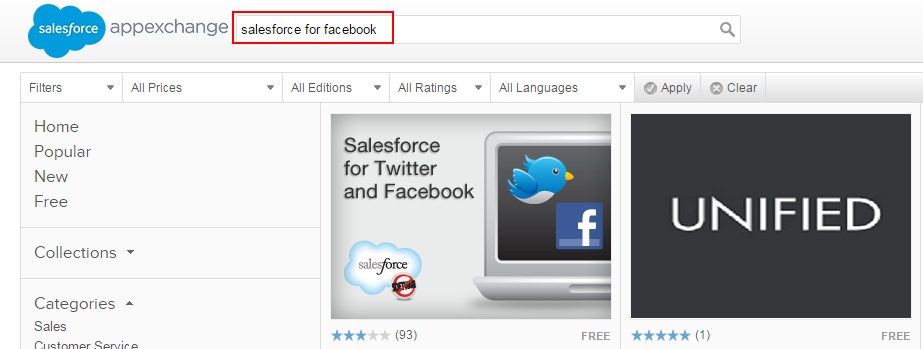
In the AppExchange search bar, search for “Salesforce for Facebook” or “Facebook integration” to find available social media apps.
Step 3: Select and Review the App
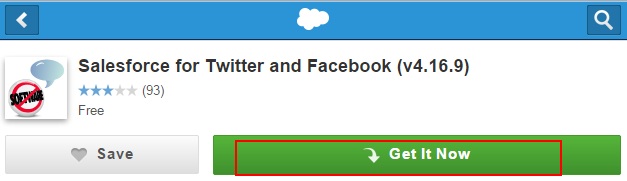
Browse the available Facebook integration applications. Popular options include “Salesforce for Twitter and Facebook” and other social media management tools. Review the app details, ratings, and compatibility with your Salesforce edition before proceeding.
Click “Get It Now” to begin the installation process for your selected Facebook integration app.
Step 4: Confirm Installation
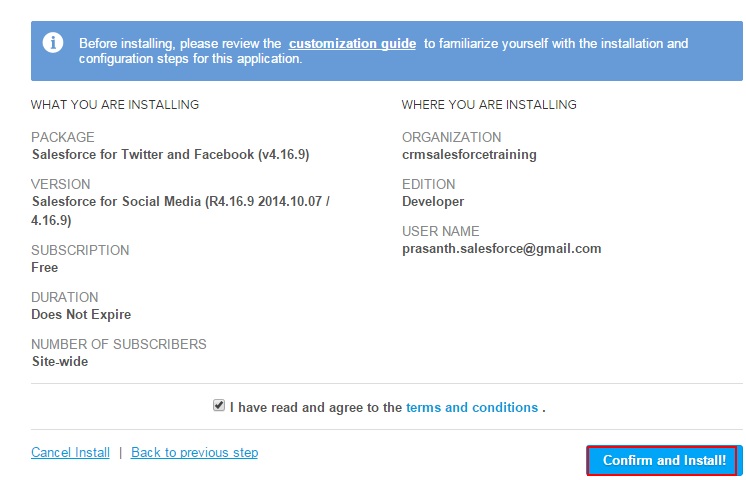
A confirmation page will appear asking you to verify the installation. Review the app permissions and click the Confirm and Install button to proceed.
Step 5: Configure User Access
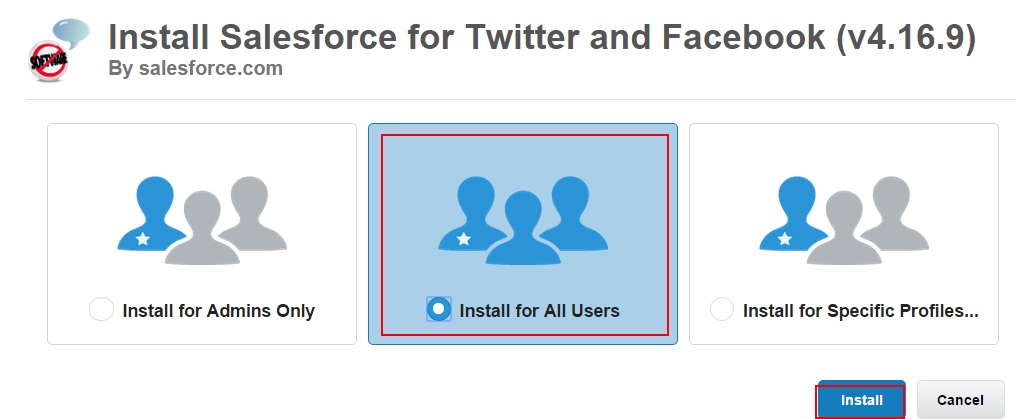
Select which users, profiles, or permission sets should have access to the Facebook integration app. Options include:
- Install for Admins Only: Restricts access to System Administrators
- Install for All Users: Grants access to all users in the organization
- Install for Specific Profiles: Allows you to choose specific user profiles
Select your preferred option and click the Install button.
Step 6: Complete Installation
The Facebook integration installation will take several minutes to complete. You will receive an email notification when the process finishes successfully.

Once installed, the social media application will appear in your App Launcher, and you can begin configuring Facebook integration settings.
AppExchange Best Practices for Salesforce Admins
When installing apps from AppExchange, follow these admin best practices:
- Test in Sandbox First: Always install and test apps in a sandbox environment before production deployment
- Review Security Settings: Examine app permissions and data access requirements
- Check API Limits: Ensure the app won’t exceed your org’s API call limits
- Monitor Performance: Track app impact on page load times and system performance
- Regular Updates: Keep installed apps updated to the latest versions
Common Salesforce Integration Patterns
Facebook integration typically follows these Salesforce integration patterns:
- REST API Integration: Real-time data synchronization between Facebook and Salesforce
- Batch Processing: Scheduled data imports for social media metrics
- Webhook Integration: Event-driven updates when Facebook interactions occur
- OAuth Authentication: Secure connection between Facebook and Salesforce accounts
Troubleshooting AppExchange Installations
If you encounter issues during Facebook integration setup:
- Verify your Salesforce edition supports the app requirements
- Check that you have sufficient user licenses for the installation
- Ensure your profile has “Customize Application” permission
- Review any error messages in Setup → Installed Packages
- Contact the app developer through AppExchange support channels
Frequently Asked Questions
What is the difference between AppExchange and App Launcher in Salesforce?
AppExchange is the marketplace where you browse and install third-party applications. App Launcher is the interface within your Salesforce org where you access installed apps and standard Salesforce features.
Are AppExchange apps free to install?
AppExchange offers both free and paid applications. Free apps may have limited features or require paid upgrades for advanced functionality. Always review pricing details before installation.
Can I uninstall AppExchange apps if they don’t meet my needs?
Yes, you can uninstall AppExchange apps through Setup → Installed Packages. However, uninstalling may result in data loss, so backup any important information first.
Do AppExchange apps count against my API limits?
Yes, most AppExchange apps consume API calls when synchronizing data or performing operations. Monitor your API usage in Setup → System Overview to ensure you don’t exceed limits.
How do I prepare for Salesforce admin interview questions about AppExchange?
Focus on understanding app installation processes, security considerations, user access management, and integration patterns. Practice explaining how to evaluate apps and manage organizational app governance.