A decision split in Salesforce Marketing Cloud Engagement routes each contact to one path in Journey Builder by evaluating attribute-based criteria. Use it when the next activity depends on data such as membership status, purchase completion, account tier, location, consent, or another value available through journey data or the contact model.
The activity evaluates configured paths from top to bottom. A contact follows the first matching path, while a contact that matches none of the configured rules follows the automatically provided Remainder path. This ordering makes rule design, data selection, and pre-activation testing important.
What Is a Decision Split in Journey Builder?
A Decision Split is a Journey Builder flow-control activity. It checks the contact against one or more filter definitions and sends that contact through the first qualifying branch. The activity does not divide an audience randomly and does not, by itself, test whether a contact opened or clicked a journey email.
Common uses include:
- Sending registered customers to an event-confirmation path.
- Stopping reminder messages after a purchase is completed.
- Routing members according to their current loyalty tier.
- Separating contacts by language, country, product, or subscription type.
- Checking whether a consent or eligibility value changed during a wait period.
Salesforce documents the activity as an ordered evaluation: paths run in sequence from the top, and the first qualifying path wins. Contacts that do not meet any configured criteria enter the Remainder branch. See the official Configure a Decision Split documentation.
How Does a Decision Split Use Journey Data and Contact Data?
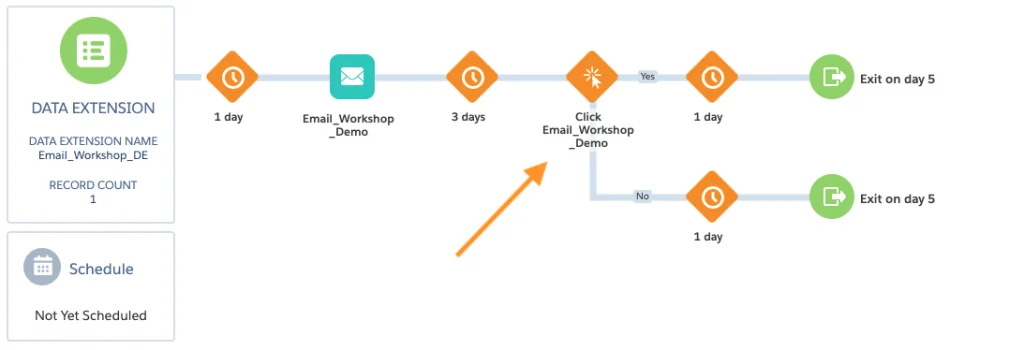
The most important configuration choice is whether the rule should read journey data or contact data. These sources can represent different values for the same business concept.
Journey data
Journey data is the contact information captured for the journey entry event. Treat it as the entry-time context for that journey instance. It is suitable when routing must be based on the value supplied when the contact entered.
For example, suppose the entry data extension contains Requested_Product. A later decision split can use that journey value to direct the contact to product-specific content, even if a separate profile table changes after entry.
Contact data
Contact data is accessed through the Contact Builder data model. Use it when the rule must evaluate a value that can change after entry, such as a completed purchase, current membership status, updated consent value, or event registration state.
Data that is not included in the entry source must be connected correctly in Contact Builder before it can be selected as contact data. Salesforce provides a documented procedure for connecting a data extension for Decision Splits.
| Question | Use journey data | Use contact data |
|---|---|---|
| Should the rule use the value captured at entry? | Yes | No |
| Can the value change while the contact waits? | No, unless the entry snapshot is intentional | Yes |
| Is the field in the entry source? | Required for that journey-data attribute | Not required if linked through Contact Builder |
| Example | Campaign code submitted at entry | Current purchase-completed status |
How to Configure a Decision Split
The following procedure applies to the standard Journey Builder Decision Split activity in Marketing Cloud Engagement. Labels can vary slightly as Salesforce updates the interface.
- Open Journey Builder and create a draft journey or a new version of an existing journey.
- Confirm that the entry source exposes the required journey attributes or that the required contact attributes are linked in Contact Builder.
- Drag Decision Split from Flow Control onto the journey canvas.
- Place the activity after the step at which the decision should occur. Add a Wait activity first when an external action or data synchronization needs time to complete.
- Open the Decision Split and select the attribute source: journey data or contact data.
- Create the first path and define its filter criteria.
- Add the remaining paths, using clear names such as
Registration Confirmed,Registration Pending, orConsent Missing. - Arrange the paths in priority order because Journey Builder evaluates them from top to bottom.
- Review the Remainder path and add an intentional activity or controlled exit.
- Save the activity, validate the journey, test with known records, and activate only after the expected routes are confirmed.
Example rule design
Consider a journey that reminds customers to complete an event registration. The entry source includes the original invitation details, while a linked profile data extension stores the latest registration state.
| Path order | Path name | Criteria | Next action |
|---|---|---|---|
| 1 | Registered | Registration_Status = 'Confirmed' |
Send confirmation information |
| 2 | Ineligible | Eligibility_Status = 'Ineligible' |
Exit without another reminder |
| 3 | Remainder | No earlier rule matched | Send registration reminder |
Both explicit paths should use contact data if those values can change after the invitation enters the journey. The Remainder branch then handles pending, blank, unexpected, or unmapped values.
How Are Decision Split Paths Evaluated?
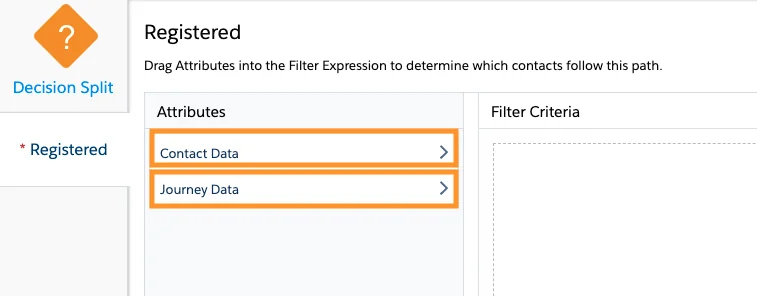
A decision split evaluates branches in displayed order. After a contact satisfies one branch, Journey Builder routes that contact down that branch and does not continue evaluating later paths in the same activity.
Assume the paths are ordered as follows:
Lifetime_Value >= 1000Membership_Level = 'Gold'- Remainder
A Gold member with a lifetime value of 1,500 follows the first path because it appears first. Reversing those branches changes the result. This behavior is useful for priority routing, but overlapping rules must be intentional.
Write mutually exclusive criteria where possible
Ranges are easier to test when they do not overlap:
- Path 1:
Score >= 80 - Path 2:
Score >= 50 AND Score < 80 - Path 3:
Score < 50
If the second path only says Score >= 50, correct routing still depends on the high-score path remaining first. Explicit bounds make the design easier to review and protect against later reordering.
Treat Remainder as an error-handling branch
Do not leave Remainder unexplained. It can receive contacts because of nulls, unexpected text, synchronization delays, a broken contact-model relationship, or criteria that do not cover every value.
In enterprise journeys, a useful Remainder branch can update an audit field, write to a logging data extension through an appropriate activity, send the contact to a safe generic path, or end the journey without communication. The choice depends on consent, business risk, and support requirements.
Decision Split vs Engagement Split
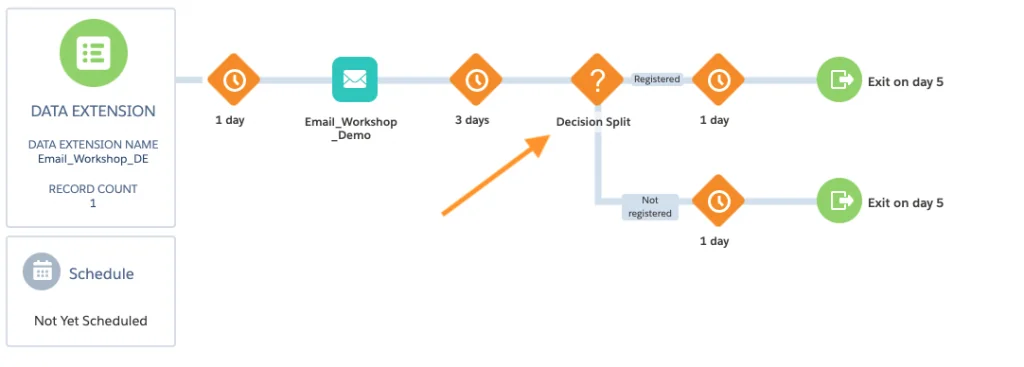
A Decision Split and an Engagement Split both control a journey path, but they evaluate different information. Choosing the wrong activity commonly causes a journey to test the wrong signal.
| Capability | Decision Split | Engagement Split |
|---|---|---|
| Primary input | Journey or contact attributes | Engagement with a preceding journey email |
| Typical conditions | Status, tier, country, consent, purchase, registration | Email open, link click, or bounce |
| Path structure | Multiple ordered criteria plus Remainder | Yes and No paths |
| Best question | What does the data say about this contact? | Did the contact engage with the message? |
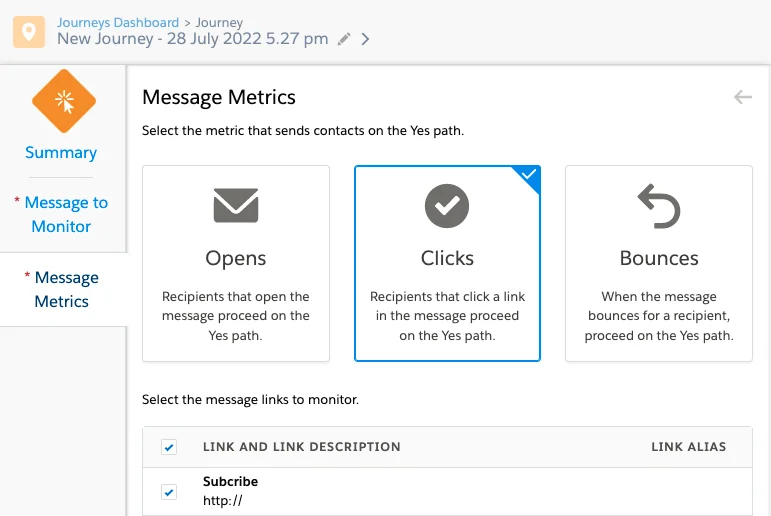
Salesforce states that an Engagement Split sends contacts down a Yes or No path based on an open, a selected link click, or a bounce for the relevant email activity. Review the official Engagement Split configuration guide.
Do not use a general decision split as a substitute for a standard email-engagement check unless you have deliberately prepared the required tracking data in an accessible data extension and understand its timing and relationship model.
Decision Split Best Practices
Use stable keys in Contact Builder
Link data extensions through a key that consistently identifies the same contact. Confirm that the selected relationship returns one intended record for each contact. Ambiguous or incorrect relationships can expose the wrong attribute value or prevent the filter from finding a value.
Do not delete and recreate active data relationships casually
Salesforce notes that deleting and reconnecting a Data Designer relationship creates a new internal relationship identifier. Existing filter-based activities that reference the old relationship can then fail to evaluate as designed. Review every affected journey before changing a relationship used by active or draft Decision Splits.
Normalize values before activation
Define how the source system represents nulls, blanks, Boolean values, dates, and status text. For example, Confirmed, confirmed, and TRUE should not be treated as interchangeable unless the source and rule design explicitly support that mapping.
Allow time for upstream updates
A split can only evaluate data that is available when the contact reaches it. Add a suitable wait when a purchase platform, Salesforce CRM synchronization, API process, Automation Studio query, or another upstream process updates the selected contact attribute asynchronously.
Keep each branch readable
Name paths according to the business result rather than generic labels such as Path 1. Document the source attribute, expected values, null behavior, owner, and downstream action in the journey design record.
Create a new journey version for production changes
Running journeys are versioned. Use the Journey Builder versioning workflow to change routing logic, then test and activate the new version according to your release process. Review Salesforce Marketing Cloud concepts and Journey Builder configuration guidance before modifying a production journey.
Common Decision Split Errors and Fixes
| Symptom | Likely cause | What to check |
|---|---|---|
| Every contact enters Remainder | Wrong data source, value mismatch, null value, or broken relationship | Inspect a test contact, attribute source, field type, exact stored value, and Contact Builder relationship |
| Contact follows an unexpected path | Overlapping rules or incorrect path order | Compare all matching rules and move the highest-priority rule above broader criteria |
| Updated status is ignored | The rule uses journey data instead of current contact data | Select a linked contact attribute when the latest value is required |
| Known value does not match | Text, date, Boolean, or number format differs | Verify the data-extension field type and the stored source value |
| Split stopped working after a model change | A Data Designer relationship was deleted and recreated | Open and rebuild affected filters against the current relationship |
| Contact reaches the split before an update appears | Synchronization or automation timing | Measure the update delay and place an appropriate wait before evaluation |
Test with a routing matrix
Before activation, prepare records that cover every explicit branch, the Remainder branch, null values, boundary values, and contacts that satisfy more than one rule. Record the expected path before running the test so that the result is not interpreted after the fact.
| Test record | Input condition | Expected path |
|---|---|---|
| T-001 | Confirmed registration | Registered |
| T-002 | Ineligible and not registered | Ineligible |
| T-003 | Pending registration | Remainder |
| T-004 | Null registration status | Remainder or a defined null path |
| T-005 | Matches two explicit paths | First matching path |
For related implementation topics, see Contact Builder data relationships, Marketing Cloud data extensions, and Marketing Cloud Journey Builder.
Frequently Asked Questions
What is a decision split in Salesforce Journey Builder?
A decision split evaluates journey or contact attributes and routes each contact through the first path whose criteria match. Contacts that match no configured path enter the Remainder branch.
Should a decision split use journey data or contact data?
Use journey data when the rule must use the value captured at entry. Use contact data when the decision must reflect a value that can change while the contact is progressing through the journey.
Why are all contacts going to the Remainder path?
Check whether the rule uses the correct attribute source, whether the stored value and field type match the condition, and whether the data extension is linked correctly in Contact Builder. Also confirm that an upstream update completed before the contact reached the decision split.
What happens when a contact matches two decision split paths?
Journey Builder evaluates paths from top to bottom and sends the contact through the first matching path. It does not send the same contact through every matching branch of one split.
Can a decision split check email opens and link clicks?
Use an Engagement Split for the standard Journey Builder check of opens, selected link clicks, or bounces from the relevant preceding email. A decision split is intended for criteria based on journey or contact attributes.
Decision Split Implementation Checklist
- Choose journey data for an entry-time snapshot or contact data for a value that can change.
- Verify Contact Builder relationships before building contact-data criteria.
- Order specific, high-priority paths above broader paths.
- Define how null, blank, and unexpected values should be routed.
- Give upstream synchronization or automation enough time to update the field.
- Test every branch, boundary, overlap, and Remainder outcome.
- Document the attribute source and business reason for each path.
- Create and validate a new journey version for production changes.