
Salesforce QTP automation
SalesForce.Com’s cloud CRM system has been steadily gaining fast momentum for some time now. Many companies have moved and moving their CRM systems to Salesforce and many more are going to do so in near future. Every quarter sales force is deploying with new features, enhancements, and abilities to the platform. So, whenever the Salesforce release’s new features for every quarter need to test the functionality by running regression scripts where Automation testing is preferable than manual testing to find the impact of release’s.
As we are aware QTP tool used for automation testing and many companies are using the Quick Test Professional (QTP) for running regressing scripts and for functional testing which can save time in a testing phase. A hybrid framework will be the best for Automating Salesforce Application which is a combination of two frameworks modular or keyword or data have driven frameworks. Combination of the modular and data-driven framework will be efficient for automating the sales force app because as sales force is mainly used for CRM and PRM functionality with modules opportunity, lead, accounts, contacts, deal etc. QTP don’t need any plugins to Automate Salesforce app and with web add in it works fine. QTP Extensively supports SFDC web application.
Why the combination of modular and data-driven framework?
We can create a function for creating an opportunity, lead, contact, account, deal, Opportunity assigning to a partner etc.
For the above mention functionalities can be created as functions as this will be reusable scenarios in many of the test scenarios and for the end to end scenarios, can be used as part of a modular driven framework.
To run the same scripts in a different sandbox with different users and to create many records use excel to pass the data as a part of a data-driven framework.
An advantage of QTP Tool for SFDC Infra team
Automated SFDC builds deployments steps which save’s the lots of time and manpower of the infra team.
More time saves at the time of releases i.e. on MTP and in different phases and at the time of refreshing from sandbox to sandbox
Here are some scenarios where we automated
1. Field level security for different objects.
2. Profile Permissions.
3. Assigning Classes and pages to the Profiles.
Which consumes more time and manpower at the time of releases.
About Frame Work:
Folder Structure:
- Folder Structure: The below folder structure to be maintained to run scripts (Do not update the folder structure/ Parent folder Name. I.e. Parent folder name should be C:\Automation Working Folder.
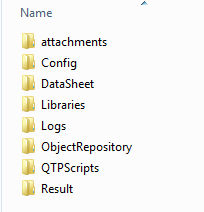
2.1. Attachments: Contains the sample documents which are used in the scripts.
2.2. Config: Contains the Config files.
2.3. Datasheet: Contains excel files where a user can update the test data.
a. File names should not be updated.
b. Column names should not be updated. (Extra columns user can add but do not update existing columns)
c. Data can be updated.
2.4. Libraries: Contains the Library files (Do not update). Functions is created for all the reusable scenarios.
2.5. Logs: Contains the Logs of the scripts run.
2.6. Object Repository: Contains the shared Repositories for all the modules.
a. Object names should not be updated.
b. New objects can be added.
2.7. QTPScripts: Contains the Main Scripts for all the Modules.
2.8. Result: Contains the results like “Excel Reporting results”.
Updating Test Data:-
In Put:
- Call: (YES/NO) – User can control the execution of the script with this column.
- YES– Continue execution for the specified iteration
- NO– Skip execution for the specified iteration
- Test Description – will not impact on script execution. Just to identify the scenario or Region.
For the remaining, all columns data is given depend on the scenarios. If you want to change the data please check the column names and change. The naming convention is given to the column names.
Out Put:
- Check the results folder as per the folder structure as mentioned above.
- The Excel sheet will be created in the date folder (particular day) in results folder with the status Pass or Fail.
Points to Check before running the script:
- Check the correct data is there in the datasheet w.r.t that module test case or scenario.
- If you want to run the script for all the regions at a time please change data in excel sheet in Call Column to Yes and run the script. So, it will execute for all the iterations in the Excel w.r.t Modules.
- If the script fails at a particular step it will come out from that step and stops the run at that step and in the results, it will give you the description for the failed steps.
- Explanation of functions: (functions.txt) in this for each object like WebEdit, Web List, Web Element …Etc. in Web Application, the functions are created.
- If the password is expired or changed change the password in the datasheet w.r.t that module and test case (or) scenario data sheet.
A flow of the scripts:
- Importing the data from excel sheet to the local data table.
- Checks how many iterations the script should run.
- Closes all the opened browsers.
- Login to Application.
- Validates all the main functionalities w.r.t Test cases or Scenarios.
- Logouts from the Application.
- Creates the results in the excel sheet in the resulting folder.
Running Script:-
Please follow below steps to run the script.
- First, get installed QTP into the local system and Get the license key.
- Open QTP (Start Button àPrograms à HP Quick Test Professional à HP Quick Test Professional).
- Check the add-in should be selected Visual Basic and Web and click ok.
- Open Test (C:\Automation Working Folder\QTPScripts\”Modulename”\”scriptname”)
- Before running check the missing resources at the bottom of the screen. It should not display any missing resources in that pane.
- Click on Run button / Automation Menu à Run / Press F5 button
- The following pop – up will appear
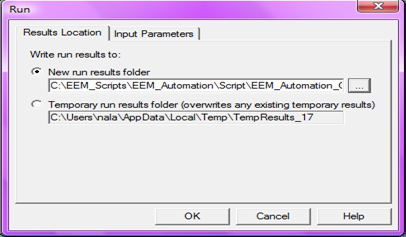
a. Select “New run results folder” option to save results to any specified folder.
b. Select “Temporary run results folder (overwrites any existing temporary results)” option to run in temporary folder i.e. Results will be stored in the temporary location. Before running the script Follow below steps to record movie file:
c. Select Tools Menu à Options (The below window will be displayed)
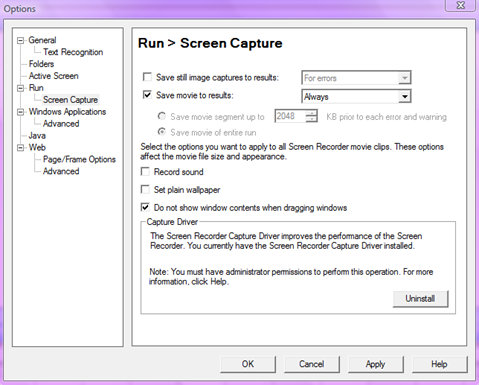
1. Select “Screen Capture”.
2. Select “Always” from “Save movie to results” list box
3. Click on “Apply”
4. Click on “Ok”
Analyzing Results:
There are two types of results will be generated after the test run. All the executed steps will be captured to these two reporting methods.
QTP Results:
After running the script, click on Results icon to open QTP results window.

Result window will be opened. Right Click anywhere and select “Expand all”
PASS Step: (yes tick mark)Symbol displayed for passed steps
Fail Step: (No cross)Symbols displayed for failure steps
Note 1: All the steps will contain “Step details” and “Step description”
Note 2: For Failure steps, screenshots will be captured to Qtp Results folder.
Excel Reporting:
The same steps which are reported in QTP will also be reported in Excel. Results sheet contains all steps captured during execution of a script.
The Excel sheet will create with the test script name in the result folder with the run date as mentioned below click and check the excel sheet result format.