Salesforce Live Agent is a real-time chat tool that enables organizations to interact with website visitors and customers instantly. When properly configured, Live Agent allows support teams to provide immediate assistance, resolve issues faster, and improve customer satisfaction. This guide covers the complete process to enable Live Agent in your Salesforce org.
What is Salesforce Live Agent?
Live Agent is Salesforce’s built-in chat platform that connects website visitors with support agents in real-time. The tool integrates directly with your Salesforce org, automatically creating cases, leads, or contacts from chat interactions. Live Agent requires specific setup steps and security settings to function properly.
Key features include:
- Real-time chat with website visitors
- Automatic record creation (Cases, Leads, Contacts)
- Chat transcript storage
- Agent presence and routing
- Pre-chat forms and post-chat surveys
- Mobile-responsive chat widgets
Prerequisites for Live Agent Setup
Before enabling Live Agent, verify your org meets these requirements:
- Salesforce Edition: Professional, Enterprise, Performance, or Unlimited
- User Licenses: Live Agent licenses for each chat agent
- Permissions: “Customize Application” and “Manage Live Agent” permissions
- API Access: Live Agent uses Salesforce APIs for real-time communication
Note: Live Agent is not available in Developer Edition orgs. Contact Salesforce to purchase Live Agent licenses.
Step-by-Step: How to Enable Live Agent
Follow these steps to activate Live Agent in your Salesforce org:
Step 1: Access Setup
Navigate to Setup from the gear icon in the top-right corner of your Salesforce org.

[Image: Current screenshot shows Classic UI — recommend updating to Lightning Experience screenshot]
Step 2: Navigate to Live Agent Settings
In Setup, go to Build > Customize > Live Agent > Settings. In Lightning Experience, search for “Live Agent” in the Quick Find box.
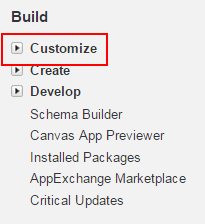
Click on “Customize” to expand the menu options and locate Live Agent.
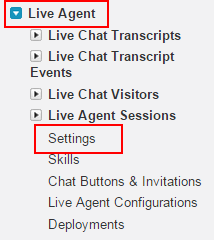
Step 3: Access Live Agent Settings
Under Live Agent, click on “Settings”. If Live Agent is not yet enabled, you’ll only see the Settings option — other Live Agent features like Chat Transcripts and Live Agent Sessions won’t be visible until activation.
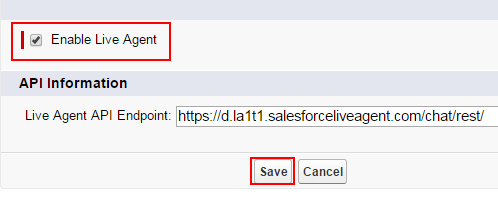
Step 4: Enable Live Agent
In the Live Agent Settings window, check the “Enable Live Agent” checkbox to activate the feature.
Once enabled, additional Live Agent features become visible:
- Live Chat Transcripts: Stores chat conversation history
- Live Chat Transcript Events: Tracks chat events and agent actions
- Live Chat Visitors: Manages visitor information and routing
- Live Agent Sessions: Monitors active agent sessions
Click Save to apply the changes.
Post-Enablement Configuration
After enabling Live Agent, complete these additional setup steps:
Configure Security Settings
Live Agent requires specific security settings to function properly:
- Remote Site Settings: Add your website domain to allow chat widget communication
- CORS Settings: Configure Cross-Origin Resource Sharing for your domain
- CSP Trusted Sites: Add trusted domains for Content Security Policy
Navigate to Setup > Security > Remote Site Settings and add your website URL as a trusted remote site.
Create Live Agent Configurations
Set up Live Agent configurations to define chat behavior:
- Go to Setup > Live Agent > Live Agent Configurations
- Click New to create a configuration
- Define settings like chat timeout, queue priority, and routing rules
- Assign the configuration to specific chat buttons
Set Up Chat Buttons and Deployments
Create chat buttons for your website:
- Navigate to Setup > Live Agent > Chat Buttons & Invitations
- Click New to create a chat button
- Configure button appearance, routing, and pre-chat forms
- Generate deployment code for your website
Common Live Agent Setup Issues
Deployment Error: Apex Jobs
If you encounter the error “You can bypass this error by allowing deployments with Apex jobs in the deployment settings page in setup,” follow these steps:
- Go to Setup > Deploy > Deployment Settings
- Check “Allow deployments of components when corresponding Apex jobs are pending or in progress”
- Retry your Live Agent deployment
Migration Tool Considerations
When using the Salesforce Migration Tool (Ant Migration Tool) to deploy Live Agent components:
- Include Live Agent metadata types in your package.xml
- Deploy Live Agent configurations before chat buttons
- Test deployments in a sandbox environment first
Live Agent Best Practices
- Agent Training: Train support agents on Live Agent console features
- Queue Management: Set up proper queue routing and escalation rules
- Performance Monitoring: Use Live Agent reports to track response times and resolution rates
- Mobile Optimization: Test chat widgets on mobile devices
- Integration: Connect Live Agent with Knowledge Base and Case Management
Frequently Asked Questions
What Salesforce editions support Live Agent?
Live Agent is available in Professional, Enterprise, Performance, and Unlimited editions. It’s not available in Developer Edition orgs and requires separate licensing.
How do I troubleshoot Live Agent not appearing after enablement?
Verify you have the correct permissions (“Customize Application” and “Manage Live Agent”), check that Live Agent licenses are assigned to users, and ensure your org edition supports Live Agent. Clear your browser cache and try accessing Setup again.
Can I use Live Agent with custom objects?
Yes, Live Agent can create records for custom objects through pre-chat forms and routing rules. Configure the object mappings in your Live Agent configuration settings.
What security settings are required for Live Agent?
Live Agent requires Remote Site Settings for your website domain, proper CORS configuration, and CSP Trusted Sites setup. These security settings allow the chat widget to communicate with your Salesforce org.
How do I deploy Live Agent components using the Migration Tool?
Include LiveChatButton, LiveChatDeployment, and LiveAgentSettings metadata types in your package.xml. Deploy configurations before buttons, and test in a sandbox first. Enable “Allow deployments with Apex jobs” in Deployment Settings if needed.