The Salesforce migration tool is a Java/ANT-based command line utility for deploying metadata between Salesforce organizations. This tool retrieves code from a source organization to your local directory, then deploys it to the target instance. It streamlines the deployment of large numbers of components across environments.
The Force.com Migration Tool (now part of Salesforce CLI) handles metadata transfers efficiently through scripted operations. It works by connecting to Salesforce APIs to retrieve, package, and deploy configuration and code changes between orgs.
When to Use the Salesforce Migration Tool
The ANT migration tool excels in specific deployment scenarios:
- Development projects – Populate test environments with large amounts of setup changes that would be time-consuming through the web interface.
- Multi-stage release processes – Iterative building, testing, and staging before production releases. Scripted retrieval and deployment makes this process efficient.
- Repetitive deployments – Retrieve all metadata, make changes, and deploy subsets of components. Repeat the process by calling the same deployment target.
- IT-managed migrations – Teams that prefer scripting environments find the Migration Tool familiar for stage-to-production deployments.
Installing the Salesforce Migration Tool
The installation requires Java, Apache ANT, and the Salesforce JAR file. Follow these steps:
Install Java JDK
Download the latest Java JDK from Oracle’s Java downloads page. Install it on your machine and note the installation path.
Install Apache ANT
Download ANT from Apache ANT downloads. Extract the files to your local machine – no additional installation required.
Set Environment Variables
Create these environment variables for proper path configuration:
| Variable Name | Path |
| ANT_HOME | ANT location on your machine. Example: C:\Ant\apache-ant-1.8.4 |
| Path | C:\Program Files\Java\jdk1.6.0\bin;%ANT_HOME%\bin |
Note: If working behind a proxy network, create additional environment variables for proxy settings.
Download Salesforce JAR File
Access the Salesforce JAR file through Setup → Develop → Tools → Force.com Migration Tool. This downloads the required ant-salesforce.jar file.
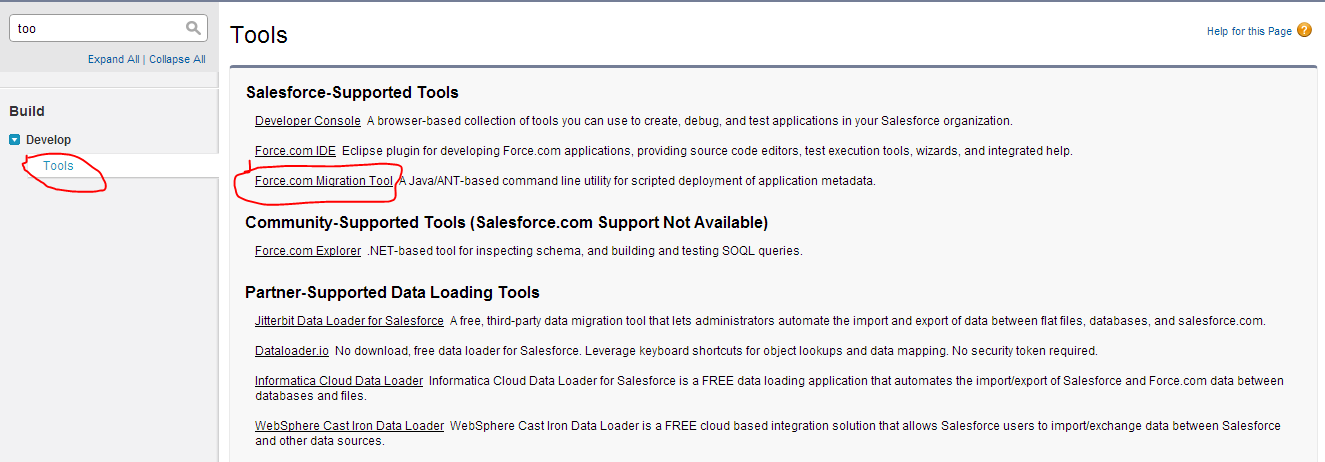
Extract the downloaded ZIP file and copy ant-salesforce.jar to your ANT installation’s lib directory.
Verify Installation
Test your Java installation by opening command prompt and typing java -version:
java version “1.6.0_37”
Java(TM) SE Runtime Environment (build 1.6.0_37-b06)
Java HotSpot(TM) Client VM (build 20.12-b01, mixed mode, sharing)
Verify ANT installation with ant -version:
Apache Ant(TM) version 1.9.1 compiled on May 15 2013
How to Use Migration Tool for Salesforce Deployment
Metadata deployment requires three essential files: build.properties, build.xml, and package.xml.
Build.properties File
This file contains organization credentials for running build.xml tasks:
| Parameter | Value |
| username | Organization username. Production: testuser@company.com, Sandbox: testuser@company.com.sandbox. User must have “Modify All Data” permission. |
| password | Password concatenated with security token (Password + Security Token) |
| serverurl | Production: https://login.salesforce.com Sandbox: https://test.salesforce.com |
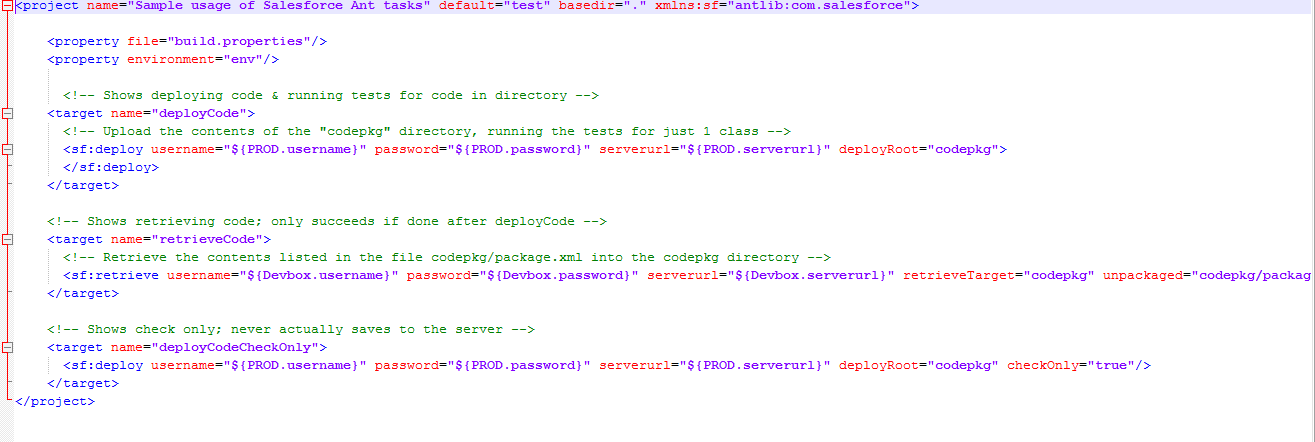
Build.xml File
This file specifies ANT commands for execution. It contains named targets that process command series when running ANT with a target name:
Package.xml File
The package.xml serves as a project manifest listing all components for retrieval or deployment in a single request. You can process only one package at a time:
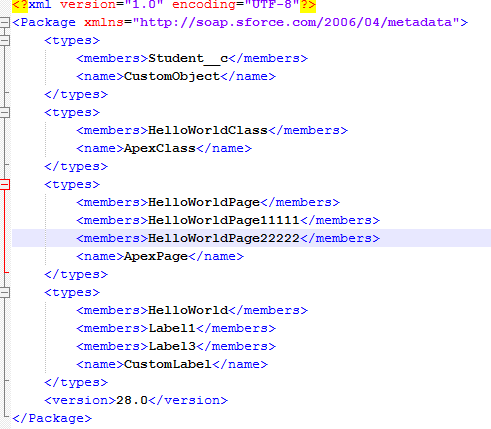
Sample build.xml and build.properties files are included in the migration tool ZIP file from the installation step.
File Organization
Organize your files in this directory structure:

Place package.xml in the codepkg subfolder within your main project directory.
Running Migration Tool Commands
Execute the migration script through command prompt:
- Open command prompt and navigate to your build.xml file location
- Example: If build.xml is in “C:\Build”, enter:
cd C:\Build - Retrieve code from source organization:
ant retrieveCode - Deploy to target organization:
ant deployCode
Common Migration Tool Use Cases
Environment Refresh
Use the migration tool to refresh sandbox environments with production metadata changes. This ensures development and testing occur against current configurations.
Release Management
Implement controlled release processes by scripting metadata movement through development, testing, staging, and production environments.
Backup and Version Control
Regular metadata retrieval creates backups and enables version control integration for tracking configuration changes over time.
Migration Tool Limitations and Considerations
API Version Compatibility: Ensure your migration tool version supports the API version of your target org. Newer features may require updated tools.
Deployment Order: Some metadata types have dependencies. Deploy in the correct sequence to avoid errors.
Governor Limits: Large deployments may hit API call limits. Break large packages into smaller chunks if needed.
Security Token: Password must include security token. Reset token if authentication fails.
Salesforce Data Migration Interview Questions
Common interview questions focus on practical migration tool knowledge:
- Explain the difference between retrieve and deploy operations
- How do you handle metadata dependencies during deployment?
- What files are required for ANT migration tool setup?
- How do you troubleshoot failed deployments?
- When would you use migration tool versus Change Sets?
- How do you handle environment-specific configurations?
Modern Alternatives to ANT Migration Tool
While the ANT migration tool remains functional, Salesforce CLI (SFDX) provides modern alternatives:
- Salesforce CLI: Command-line interface with enhanced features and better performance
- VS Code Extensions: Integrated development environment with built-in deployment capabilities
- DevOps Center: Native Salesforce solution for release management
These tools offer improved user experience while maintaining the same core functionality as the ANT migration tool.
Frequently Asked Questions
What is the difference between Salesforce migration tool and Change Sets?
The migration tool uses command-line scripting for automated deployments and supports all metadata types. Change Sets work through the Salesforce UI but have limitations on certain metadata types and require manual intervention for each deployment.
Can I use ANT migration tool with Salesforce DX projects?
While possible, Salesforce CLI (SFDX) is the recommended approach for modern development. The ANT migration tool works with metadata API format, while SFDX uses source format for better version control integration.
How do I handle failed deployments with the migration tool?
Check the deployment log for specific error messages. Common issues include missing dependencies, validation rule conflicts, or insufficient user permissions. Use the checkOnly parameter to validate before actual deployment.
What permissions are required for migration tool deployment?
The user account needs “Modify All Data” permission or specific permissions for each metadata type being deployed. System Administrator profile typically has all required permissions.
Can the migration tool deploy to multiple orgs simultaneously?
No, each deployment targets a single org specified in build.properties. For multiple orgs, create separate build.properties files or modify the file between deployments.