Queues in Salesforce service cloud allow groups of users to manage a shared workload more efficiently. They are particularly useful in service environments where multiple agents can pick up cases from a common pool.
Features of Queues
| Feature | Description |
|---|---|
| Shared Ownership | Records in a queue are owned by the queue itself, not by individual users. |
| Supported Objects | Queues can be created for standard objects like Cases, Leads, and also for Custom Objects. |
| Queue Members | Members can include Users, Roles, Public Groups, and Roles & Subordinates. |
| Email Notifications | Queues can have an email address to receive notifications when new records are added. Optionally, notifications can be sent to all queue members. |
Creating Queues
Creating a queue involves defining its members and specifying the objects it will handle.
Steps to Create a Queue
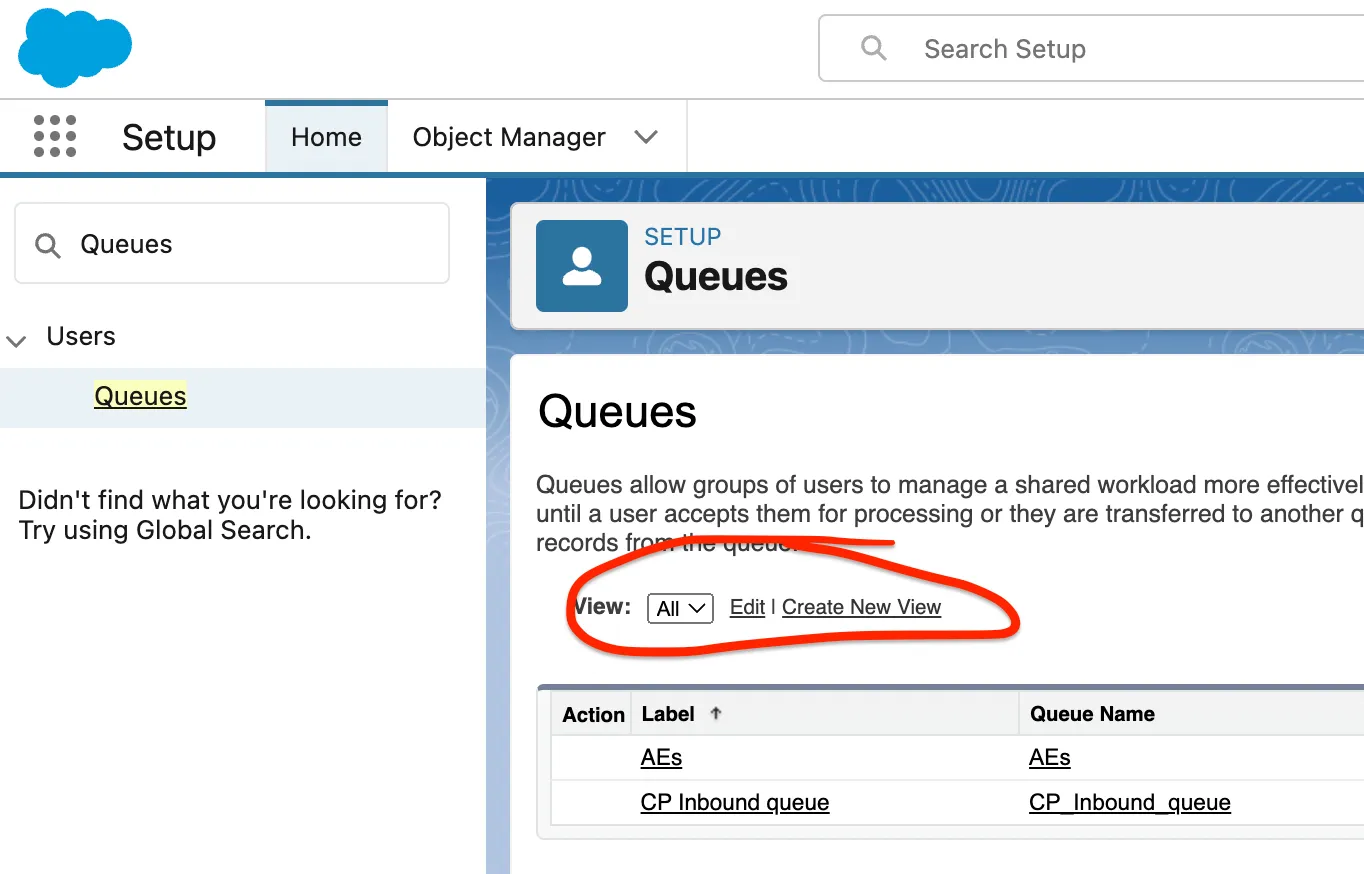
1. Navigate to Queues
- Go to Setup:
- Click the Gear icon in the top-right corner and select Setup.
- Find Queues:
- In the Quick Find box on the left, type Queues.
- Select Queues under Users.
2. Create a New Queue
- Click on New:
- On the Queues page, click the New button.

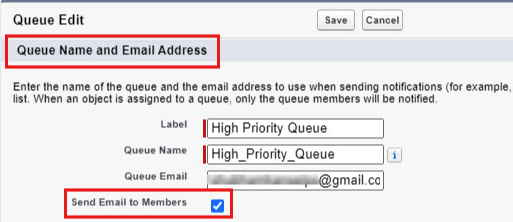
- Fill Out Queue Information: Field Description Queue Label Enter a name for the queue (e.g., High Priority Cases). Queue Name This will auto-populate based on the label.
- Queue Email (Optional) Provide an email address to receive notifications when new records are added to the queue.
- Send Email to Members Check this box if you want all queue members to receive email notifications when new records are added.
- Queue Members Add members by selecting Users, Roles, Roles and Subordinates, or Public Groups from the available list.
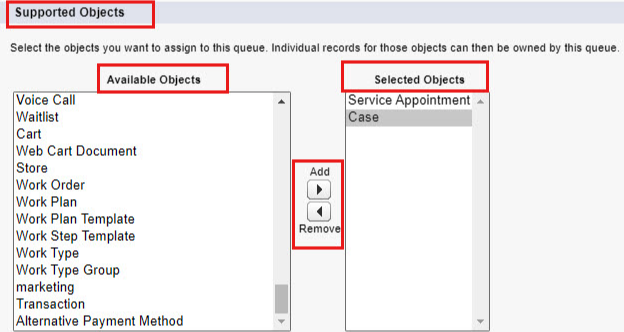
- Select Supported Objects:
- In the Supported Objects section, choose the objects that this queue will handle. For example: Available Objects Selected Objects Cases → Cases
- Move Cases (or other objects) from Available Objects to Selected Objects using the Add (→) button.
- Save the Queue:
- Click Save to create the queue.
Example: Creating a “High Priority Cases” Queue
Let’s create a queue specifically for handling high-priority cases.
- Queue Information: Field Input Queue Label High Priority Cases Queue Name High_Priority_Cases Queue Email highpriority@yourcompany.com Send Email to Members ✔️ Checked
- Queue Members:
- Users:
- Add specific users who will be part of this queue.
- Roles and Subordinates:
- For example, add the Support Agents role and subordinates.
- Users:
- Supported Objects:
- Cases:
- Move Cases to Selected Objects.
- Cases:
- Save:
- Click Save to finalize the queue creation.
Utilizing Queues
Now that the queue is created, cases assigned to this queue will be visible to all queue members. Here’s how it enhances case management:
- Workload Distribution: Agents can pick cases from the queue based on their availability and expertise.
- Visibility: All queue members can see which cases are pending, allowing for better team collaboration.
- Notification: If enabled, members receive email notifications when new cases are added, ensuring prompt attention.
Assigning Cases to Queues
Manually Assigning a Case to a Queue
- Navigate to the Case Record:
- Go to the Cases tab and select the case you want to assign.
- Change Case Owner:
- Click on the Change Owner button (often found in the Details section).
- In the Owner field, select Queue.
- Choose the appropriate queue (e.g., High Priority Cases).
- Click Save.
Automatically Assigning Cases to Queues
- Use Case Assignment Rules:
- Set up Assignment Rules to automatically assign cases to the queue based on specific criteria (e.g., when Priority equals High).
Conclusion
By effectively utilizing queues in Salesforce Service Cloud, organizations can streamline their case management processes, ensuring that customer issues are addressed promptly and efficiently. Queues enable collaborative work environments where agents can share the workload, leading to improved customer satisfaction and support team productivity.