| Feature | Description | Benefit |
|---|---|---|
| Automatic API Compatibility | Selects compatible API version automatically if the latest version isn’t supported by the organization | Smooth operation without manual intervention |
| OAuth Authentication Support | Web Server OAuth allows login without security tokens | Increases flexibility for restricted IP access |
| Separate Java Runtime | JRE is no longer bundled; users must install JRE v17+ separately | Simplifies OS compatibility |
| Bulk API 2.0 Integration | Adds Bulk API 2.0 to handle high-volume data uploads | Enhances efficiency for large data transfers |
| Custom Configuration Options | Expanded settings and improved error messages for easier troubleshooting | Simplifies data session management |
Salesforce’s recent Data Loader updates aim to improve efficiency, flexibility, and security in data handling. With Automatic API Compatibility, Data Loader now auto-selects a compatible API version if needed, eliminating common integration issues. OAuth Authentication simplifies access by allowing login without security tokens, ideal for companies with restricted IP access. The separation of Java Runtime Environment (JRE) allows administrators more control over compatibility and installation requirements. Additionally, Bulk API 2.0 integration optimizes large-scale data uploads, a critical feature for users managing extensive data sets. Finally, customizable configurations streamline user management and troubleshooting, making Data Loader more adaptable and efficient.
What is Salesforce Data Loader?
Salesforce Data Loader is a robust tool for bulk data operations in Salesforce, enabling large-scale data imports, exports, updates, and deletions. With the capacity to process up to 500,000 records in a single batch, it is ideal for high-volume data tasks, supporting both Salesforce Classic and Lightning Experience. Data Loader’s versatility comes from its ability to handle complex data management needs through both command-line and user interface (UI) options.
Key features of Salesforce Data Loader include:
- Large Data Handling: Supports bulk processing of up to 500,000 records at once.
- Automated Scheduling: Enables regular, automated imports and exports.
- Backup and Export: Useful for data backup by exporting data securely.
- Customization: Allows for script-based automation using the command-line interface.
These features make Data Loader a preferred choice for advanced data management in Salesforce.
– When importing data, Data Loader reads, extracts, and loads data from comma separated values(CSV) files or from databasa conections. When exporting data, it outputs CSV files.
We can use data loader in following 2 ways.
- User Interface
- Command Line
Key Features of Salesforce Data Loader
Here’s an updated list of key features of Salesforce Data Loader, reflecting the latest improvements and trends:
- Intuitive Interface: An easy-to-navigate wizard-based UI for interactive use.
- Command Line and API Integration: Enhanced command-line interface for automated batch operations, supporting integration with scripts and API workflows.
- Large File Support: Now handles files with up to 5 million records, optimizing it for enterprise-level data processing.
- Enhanced Field Mapping: Drag-and-drop field mapping and automatic matching of fields streamline data import, making setup faster.
- Comprehensive Object Support: Supports all Salesforce objects, including custom objects and external objects in cross-system operations.
- Flexible Platform Compatibility: Functions across Salesforce Classic, Lightning, and Database.com, extending usability.
- Detailed Log Files: Provides extensive success and error logs in CSV format, aiding troubleshooting and reporting.
- Embedded CSV Viewer: Simplifies data review by allowing users to view and edit CSV files directly within the tool.
- Broad OS Compatibility: Now supports Windows 10, Windows 11, and the latest macOS versions, ensuring flexibility across modern operating systems.
These features enhance Data Loader’s efficiency, usability, and compatibility, making it ideal for complex data management in today’s dynamic Salesforce environments.
Import Wizard vs Salesforce Data Loader Data Loader
When to Use Salesforce Data Loader
- Large Data Loads: Data Loader is ideal for importing large datasets exceeding 50,000 records, capable of handling up to 500,000 records in a single batch.
- Unsupported Objects: Use Data Loader for objects not compatible with the Import Wizard.
- Scheduled Imports: Data Loader enables automated, scheduled data loads, such as nightly imports for ongoing updates.
- Data Export for Backup: It’s also an effective tool for exporting data regularly for backup purposes.
When to Use the Import Wizard
- Small Data Loads: For datasets with fewer than 50,000 records, the Import Wizard is efficient and easy to use.
- Supported Objects: If the object is supported by the Import Wizard, access this tool under
Setup -> Data Managementto confirm compatibility. - Duplicate Prevention: The Import Wizard includes options to prevent duplicates by matching on fields like Account Name, Contact Email, or Lead Email, ensuring data integrity during import.
Installing Data Loader
1. Log in to your salesforce application.
2. Go to setup-> Data management ->data loader
see the following image for reference
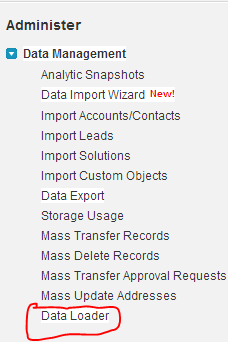
Once you clicked on data loader you will navigate to another screen there you can download data loader.
3. Install that downloaded file in your machine.
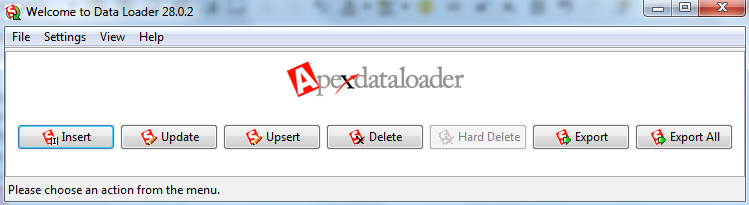
4. To start data loader double click on short cut on your desktop or go to Start > all programs >saledforce.com>Apex data loader>Apex Data loader.
Following is look and feel of data loader.
To log in to data loader click on any operation and provide your log in credentials. If you are log in to Production please provide “Password+security token” in password field.
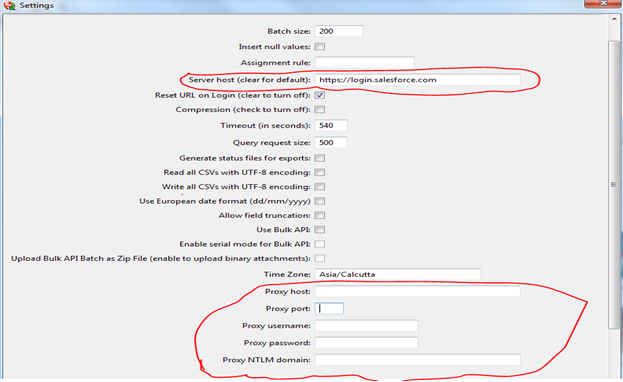
Before log in to data loader please change settings. Go to settings and provide server host url.
If you are working under proxy settings please provide proxy details.
Salesforce Data Loader Operations
Inserting records:
To insert records into Salesforce click on insert button and login with your credentials, during login provide “your org password + security token”.
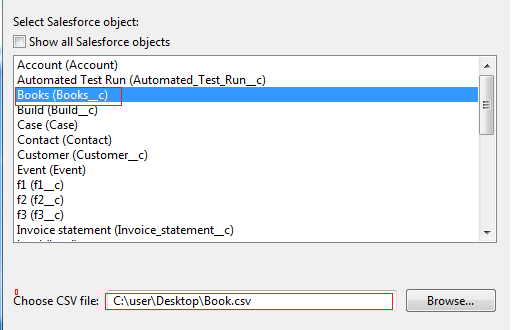
Click on NEXT and select the object you want to insert the records and choose the .csv file you want upload.
Note: Data loader allow only .csv files.
Map the fields by using drag and drop.
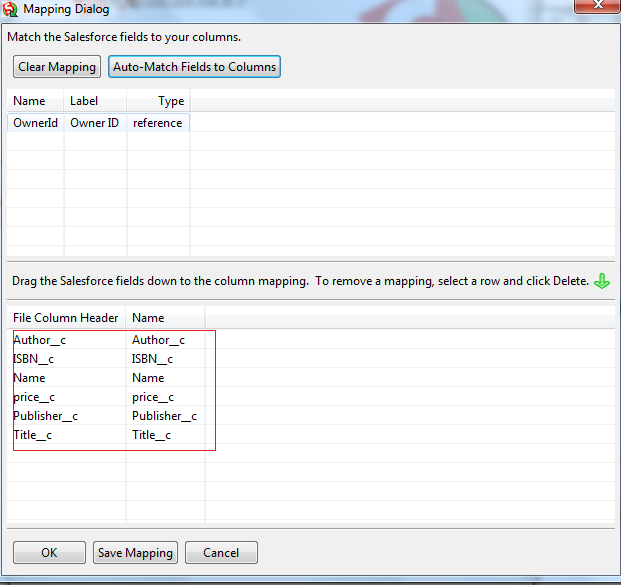
Click on ok or save the mapping if need in future.
Click on NEXT and then click on Finish. After inserting records it will display error files and success files.
Update:
To update the records click on update and login.
Next select the csv file contains updated records with IDs and sect the object and complete the operation.
Upsert:
Upsert also same as update but here we can insert new records also.
By using this operation we can insert new records and update existing new records.
Export:
Export means down loading the data from organization
– Click on export button and then login with your credentials.
– Select the object you want to export data and specify the folder where you want to save this exported file.
– And then finish the operation
Export All: “Export All” means it will give the data including data in recycle bin.
Delete:
Delete means it will delete data from your organization. To delete the data you want export the existing data with ID’s and then by using this file we can delete the data. The data deleted by this operation will be available in recycle bin. If want delete data permanently choose hard delete option.
To delete data from object follow below mentioned activities
– Click on delete button and login with your org credentials.
– Select the object you want to remove the data. And select the csv files with record id’s you want remove.
– Map the ID field and then complete activity
Hard Delete
Hard delete means deleting the data permanently from the org. That mean data will not be stored recycle bin. To enable this button enable bulk API. To enable bulk API button go to data loader settings and then enable bulk API check box.